GIS Exercises & Projects: What they are and what to turn in for credit.
The labs from the book or online will lead you through steps. I will ask you to “post” certain parts of these exercises. That means filling out a word doc with the requested material, which you will then save as a PDF to turn in, to Canvas. Extra credit points may be available. I have to be able to easily read your posts at page level to evaluate it without zooming in. If I ask for a “screen capture” don’t capture a giant monitor (in the lab) or your whole desktop; use a tool to takes a reasonable piece of the terrain. You have snipping/screenshot tools in both Windows and Mac that let you take part of the screen; just ask if you need help finding/using one of them.
The deadline for finishing weekly exercises and projects is the following Monday at midnight. Please turn your work in to the Canvas site under Assignments. Every file you submit for this course needs to start with your last name and be followed by a descriptive title (e.g., harbor_week1_exercises.pdf)
If you have a question or ArcGIS doesn’t cooperate, please post your question in the Exercises Discussion in Canvas. You can start there to look for answers as well; if you post a new question, I’ll get an email and respond there so that everyone benefits. You might also want to get notifications for that discussion. Please name your Post “Exercise 1 – your brief description here” Thanks.
2024 Exercises
Week 9
Exercise 6 – Landsat Data download/discovery and QGIS watersheds
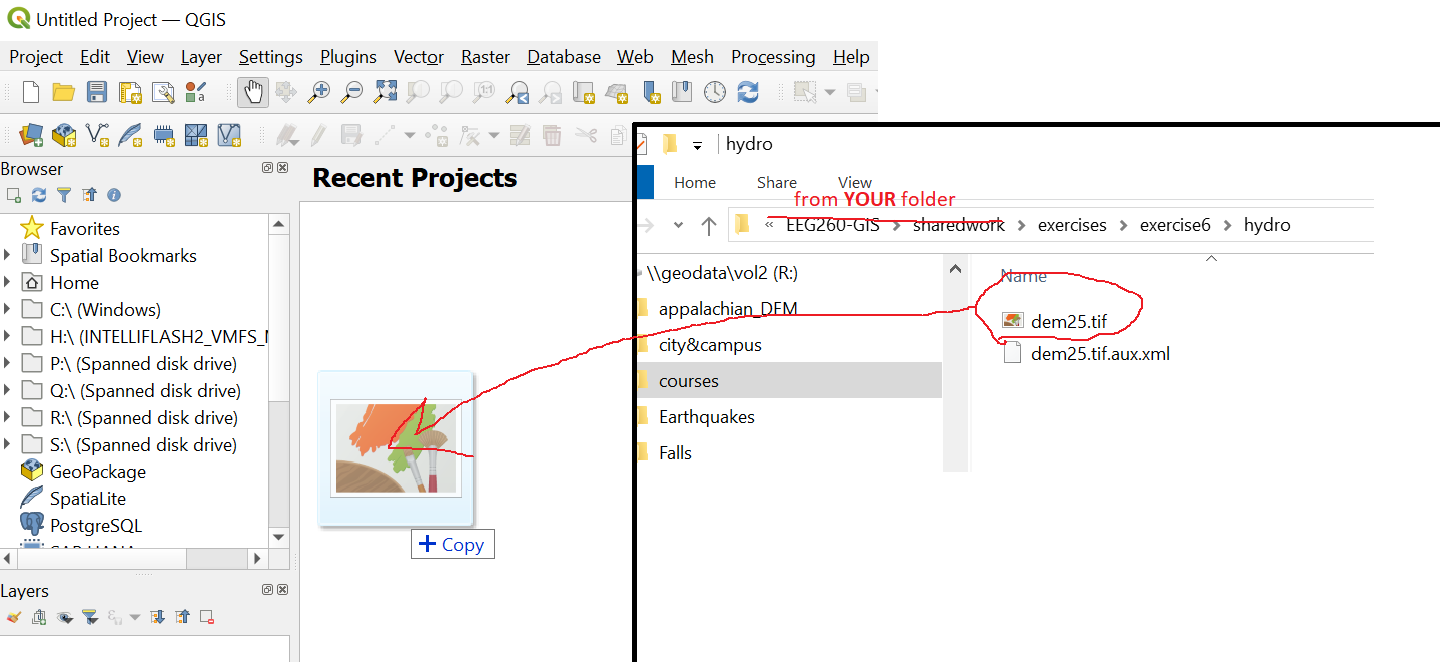
Copy the lab report template and data for part two found in this folder
R:\courses\EEG260-GIS\sharedwork\exercises\exercise6
Part 1: download satellite imagery
-
- Web Exercise, but read through ALL of these instructions before you start it please – Download Imagery (1 1/4 hour…not including the download time)
- make sure you have a folder set up to receive the data on P drive. You’ll also build a new project in that folder, but un-check the “add new folder” button on the “new” project page from ArcGIS Pro so that the images and ArcGIS project wind up in the same folder. You’ll be sending a snip of your folder contents.
- Instead of Singapore do this exercise on a place that you know, that you’re likely to do your project, or at least some place you find interesting (great geology, great vegetation contrasts, interesting environmental problems, home, etc). You can use this same image in your final project, if you know where your project is going to be centered. If the downloading takes a long time, you can start on the next par of the exercise while you wait.
- Move the downloaded file from wherever it goes to your P drive before you unzip it. You MUST use 7-zip, see below. It has to do with carriage returns and line feeds, if you’re curious….ask Dave. 7zip is a free download. You should always use it for GIS data.
- update: they are only “TAR”ed now, not zipped. Use 7zip to untar them.
Satellite images come as “.tar.gz” fles, which means you’ll have to open and unpack it twice, or right click on the fle and choose “7zip/Extract here” two times to frst “unzip” the fle, then right click on the new “.tar” fle to “un-tar” (un-TapeARchive) it into the multiple fles.DO NOT USE WINDOWS EXPLORER TO SEE OR OPEN ZIPPED FILES.
sorry for shouting. - As you go through the exercise, I’ll ask for some snips to post to your lab report.
Part 2: Working with QGIS (open-source, free to use!)
-
- NO…. Not yet. We have to install SAGA libraries into QGIS. (the instructions on how to do that are in this pdf Adding SAGA to QGIS). However, going through the video more carefully, he says at the very end that some of the SAGA tools no longer work in QGIS, which we discovered in lab. He recommends a different plugin entirely. If you want to use QGIS on your laptop or in the lab, I’d install and try the PCRaster Tools plugin instead, and look for tools similar to the SAGA tools.
Open QGIS from the desktop- if you’re working on your own PC Download QGIS to your PC or Mac (laptop or workstation) and install it. The lab uses version 3.30.3 so it will be a bit different than the newest one. https://qgis.org/en/site/forusers/download.html
- The following tutorial uses data that I’ve downloaded (it comes with QGIS). Those data are in the hydro folder of
R:\courses\EEG260-GIS\sharedwork\exercises\exercise6 - You’ll be using the “processing” toolbox, which is similar to the “task” or a geoprocessing toolbox in ArcSpeak. WARNING: QGIS processing tools default to a temporary file that winds up in your C temp folder. Make sure the created file goes to P or your own C drive project
folder where you want it! - Open QGIS, drag your data into the window to start a new map window.
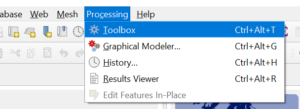
- Open the processing window from the Processing Menu
- Completing the exercise (note: your boxes may look different than what is shown in the exercise 6 folder….. do you best to figure out what it wants). It is here 17.16. Hydrological analysis using a QGIS tutorial
https://docs.qgis.org/3.34/en/docs/training_manual/processing/hydro.html
- NO…. Not yet. We have to install SAGA libraries into QGIS. (the instructions on how to do that are in this pdf Adding SAGA to QGIS). However, going through the video more carefully, he says at the very end that some of the SAGA tools no longer work in QGIS, which we discovered in lab. He recommends a different plugin entirely. If you want to use QGIS on your laptop or in the lab, I’d install and try the PCRaster Tools plugin instead, and look for tools similar to the SAGA tools.
Week 7
Exercise 5 Georeferencing and digitizing polygon data
Make a new folder in box or on P to house your exercise for this week. Copy the following from Box\2024GIS\2024GIS_sharedwork\exercises\exercise5 to that new folder
-
- the lab report template
- the Bolstad lab 3 instructions (pdf)
- digitize folder
- BolstadLab3 folder
- do not copy the “geo_maps” folder…you only need one specific file from it.
Part 1: Georeference a scan of a geologic map- instructions on this page
Part 2: Learn about digitizing polygons
– work on more of Bolstad’s Lab 3, this time digitizing polygons
– The pdf instructions from Bolstad and the BolstadLab3 ArcGIS Pro project folder are in Box\2024GIS\2024GIS_sharedwork\exercises\exercise5
Part 3: Digitize the geology- instructions continue on this page
Week 5
Exercise 4 is an Online tutorial – creating processing models and least-cost paths.
Completing it, you’ll learn about the ModelBuilder and these analyses
-
- neighborhoods (focal stats)
- weighted overlays (using weighted sums)
- cost analysis (corridors and least cost paths)
which we will explore in great detail in the coming weeks in class.
- Copy the data and starter project from box..\sharedwork\exercises. Open the project and resave with your name
Box is being really slow today for me….You can copy it from here too
R:\courses\EEG260-GIS\sharedwork\exercises
which is also
\\geodata\vol2\courses\EEG260-GIS\sharedwork\exercises
to your desktop.
When you’re done, make sure you copy it to a safe place! (geodata or box). - The link to the online tutorial is in the report template word doc. Start there.
- Note. I have had some issues with box being squirrely and slow (from home) perhaps due to updating links to box online. If you have troubles, save the project, close it, and take ten breaths to let Box catch up, copy the entire folder from where it is on your computer C:\users\……\Box\…etc to the desktop and work from there. Don’t forget to copy it back to box via the web when you’re done working on it. I would save it in a different folder each time, don’t overwrite your old copy. (ex4_v1, ex4_v2, etc)
Week 4
Exercise set 3 – digital topography and digitizing new point features
- You will do most of Bolstad’s lab 11 and one portion of lab 3.
- In the middle of Lab 11, he asks you to digitize a new point, and you don’t have that skill yet. Therefore, you’ll do one piece of lab 3 to learn how to make anew feature class and digitize data into it. You’ll then return to lab 11 to continue.
- Your exercise report template, and PDFs of my edited versions of Lab 11 and Lab 3 are in box/2024GIS_sharedwork/exercise/exercise3, and all the data you need is in the folder “Lab11” including one image you’ll need for Lab 3.
- For basic questions after lab, see Bolstad Chapter 11 on Terrain Analysis, or use the discussion linked above. However, the step by step guidance of his lab will get you going on most parts of the terrain topic involving watersheds.
Week 2
- This week we are taking pieces from three of Bolstad’s exercises, Labs 2, 7 and 8. Largely they focus on coordinate systems and table operations. I have cut pieces from each to make this possible for a single lab period. They may have lots of pages of explanation, especially lab 2, but not many actual steps or things to turn in.
- Videos he refers to can be located in the authors website as previous.
- The data, a PDF of the instructions and a word document for your lab report are all included in the box/2024GIS_sharedwork/exercise/exercise2 folder, which you should copy to your own exercises folder.
- This week I want you to estimate how many hours this lab took you in total. Please keep track and put that in the top of your report. Thanks in advance.
Week1
Part 1: Bolstad’s “Lab 1: Introduction to ArcGIS Pro.”
-
- This exercise comes from the introductory tutorial for your textbook entitled “Lab 1: Introduction to ArcGIS Pro.” Bolstad’s page has links to a YouTube channel with short helpful videos that show his students how to do things in ArcGIS Pro. He also links to some of these videos in his instructions. I’ve made some changes and suggestions to his instructions, so don’t download those from that website please. Use mine instead. See below.
-
-
- copy the material to use for today (the “Exercise1” folder)
- ..\box\2024GIS_sharedwork\exercises
to your own exercises folder - 2024GIS_studentx\exercises
- ..\box\2024GIS_sharedwork\exercises
- in that folder, you’ll find
- a folder with the data supplied by Bolstad
- a pdf with edited instructions for this Bolstad Lab
“L1_Intro2ArcPro_harborinstructions2024.pdf” - a word doc with spaces for your “answers” to this lab, aka the “lab report”
“Your_last_name_Exercises_1_Week_1_2024.docx”
- The instructions (his, and my editing) will ask you to make maps and provide information for this report. Part two will also use that same lab report and will request certain items to report. I recommend you keep it open and refer to it as you work, so you know what to “snip” and save.
- copy the material to use for today (the “Exercise1” folder)
-
Part 2: ESRI Quick-Start Tutorial – “Add data to a project” for ArcGIS Pro 3.1
This tutorial will expand the search for data to online data sources from geodatabases and shapefiles. It is delivered as a “project package” which will automatically unpack in the default location, which is the lab computer C drive. We will have to copy the project after it unpacks to your box exercises folder.
- Start the tutorial linked above but only through step 6 of the first part. After you’ve started ArcGIS Pro and opened the “Add data to a project” project, please
STOP!
Where did it go? Go find out in ArcGIS Pro by going to the File Menu and choosing “Options” from the list

- Copy the folder location shown above from the options window and paste it into a Window Explorer address bar and also post it to your lab report.
- Save the project with your name in the project name (e.g., harbor_add_data_etc.aprx) into that extracted folder and close the project.
- In windows explorer, copy the entire package folder “Add_data_….” and paste it in your box\2024GIS_yourname\exercises\exercise1 folder.
- Open the ArcGIS project from there instead by double clicking it. Now it is permanent and won’t be erased when you log off.
See the lab report Word doc for what and how to report your work on this online project.